
Optimizing Kubernetes applications in the public cloud that are bursty and experience varied traffic loads isn’t easy. Some days, you barely have any activity, while on other days, your server gives up and isn’t able to handle any requests. As an SRE, you set up auto-scaling on your Kubernetes cluster to handle the varying demands. However, you notice that during low-traffic periods, you still have resources that are over-provisioned, which leads to unnecessary costs. This is a common problem with traditional auto-scaling practices. And Kubernetes makes it worse in many ways.
That’s where tools like open source Karpenter help – with bin-packing, efficient auto-scaling, optimizing resources, and keeping your EKS costs down. In this blog post, we’ll do a deep dive into what is Karpenter and learn about everything Karpenter. We will see how it fares compared to traditional cluster auto-scaler. We’ll look at its internal workings, concepts, benefits, and user cases. We’ll study its limitations and what to watch out for.
Auto-Scaling Dilemma
When dealing with applications with fluctuating traffic, you can implement auto-scaling mechanisms like cluster-auto-scaler. This method automatically adjusts the number of nodes in the cluster depending on the demand. While they do the job, they fall short in many key areas.
- Slow scale time: One of the major challenges is slow scale time. Traditional methods leverage metrics like CPU and RAM to determine when to scale up or down. When there’s a change in demand, the auto-scaler needs to request new nodes, which can take a while to come up and read to handle the load, leading to a performance bottleneck.
- Resource overprovisioning: Traditional auto scalers often overprovision resources and add more capacity than necessary. For example, when an auto scaler notices a sudden spike, it will add a node to handle the spike; however, that node might not be fully utilized after the spike subsides.
- Limited flexibility in instance selection: Traditional scaling mechanisms select instances based on a pre-defined list of node types, which may not always align with your workload needs. This limitation can lead to inefficient resource use, as certain workloads might benefit from different instance types with specific CPU, memory, or storage configurations.
- Inability to handle diverse workloads: When dealing with different workloads with different resource requirements, traditional auto-scalers often fail to balance the needs effectively. They usually scan based on a single metric, which might not be able to address the diverse demands of diverse workloads.
These traditional auto-scaling methods lead to sub-optimal use of resources, thus leading to increased costs and operational inefficiencies. The dilemma, then, is how to scale your infrastructure in a way that meets the demands effectively without over-provisioning or slow response times.
What is Karpenter
Karpenter is an open-source auto-scaling tool built by AWS that is designed to dynamically optimize resource utilization in cloud environments. Unlike traditional auto-scalers, which often rely on predefined metrics and can respond slowly, Karpenter takes a holistic approach and intelligently provisions resources based on real-time demands. This not only enhances performance during traffic spikes but also reduces overprovisioning, leading to significant cost savings.
Karpenter addresses the limitations of traditional autoscaling by introducing several innovative features.
- Just-In-Time (JIT) Provisioning: Karpenter provisions the nodes rapidly as per the requirement. The provisioning happens in real-time instead of maintaining the excess capacity compared to traditional auto scalers.
- Rapid Scaling Down of Underutilized Resources: Karpenter quickly scales down the unutilized nodes/resources, preventing over-provisioning and reducing overall costs.
- Flexibility in Selecting Cost-Effective Instances: Karpenter allows users to choose the most cost-effective instances from multiple options based on their workload, reducing the cost of instances.
- Effective Bin-Packing for Better Resource Utilization: Karpenter’s bin-packing feature ensures the maximum utilization of resources. It allows workloads to run efficiently on fewer instances, further reducing the cost.
Want to experience how Karpenter does JIT provisioning and bin-packing hands on? Join us free for the next session of our popular Karpenter hands-on workshop.
Karpenter Architecture
Karpenter is designed to efficiently manage and scale Kubernetes clusters as a node lifecycle management tool by dynamically provisioning and de-provisioning resources. This not only improves resource utilization but also keeps costs under check. At the fundamental level, Karpenter performs the following tasks:
- It watches for the pods marked as unschedulable by the Kubernetes scheduler.
- It evaluates the scheduling constraints requested by the pods, such as resource requests, affinities, tolerations, etc.
- It provisions the nodes based on the criteria of the pods.
- It disrupts the nodes when they are not needed.
Below are the components and concepts one needs to know to understand Karpenter better.
Components
NodeClasses
Specify the instance types and configurations that Karpenter can use to provision nodes. These act as templates for node creation by specifying attributes like AMI, network, and security-related configurations. They help select the most suitable instance based on workload needs.
NodePool
NodePools manage a group of nodes that share common properties and are often linked to a Node Class. Based on this, Node Pools define what type of nodes to create and scale when required.
Below is a sample yaml spec showing NodeClasses and NodePools:
# NodePool that references a specific NodeClass
apiVersion: karpenter.sh/v1
kind: NodePool
metadata:
  name: default
spec:
  template:
spec:
  nodeClassRef:
    group: karpenter.k8s.aws
    kind: EC2NodeClass
    name: default
---
# NodeClass that defines the basic configurations for the nodes
apiVersion: karpenter.k8s.aws/v1
kind: EC2NodeClass
metadata:
  name: default
spec:
  amiFamily: AL2
  subnetSelectorTerms:
- tags:
    karpenter.sh/discovery: "${CLUSTER_NAME}"
  securityGroupSelectorTerms:
- tags:
    karpenter.sh/discovery: "${CLUSTER_NAME}"
  role: "KarpenterNodeRole-${CLUSTER_NAME}"
In the above specification,
- The NodePool points to a NodeClass to provision nodes based on the specification provided.
- The NodeClass has different attributes defined:
- amiFamily: Specifies the AMI family for the nodes
- subnetSelectorTerms: defines the subnets where the nodes must be provisioned
- securityGroupSelectorTerms: specifies the security groups for the nodes.
- role: assigns an IAM role
NodeClaims
NodeClaims are the demands for new nodes based on the current workload.
Karpenter evaluates these to determine if new nodes should be provisioned to meet the demand. When a NodeClaim is created, Karpenter provisions a node matching the specified requirements. It evaluates the requirements of pending pods, matches them to a compatible NodePool and NodeClass pair, and initiates a NodeClaim that satisfies both requirements.
Scheduling
The process by which Karpenter determines where to place workloads on the available nodes. It dynamically provisions nodes and places pods across clusters depending on the resource requirements and constraints. It ensures efficient use of resources based on current cluster demands.
Disruption
Refers to the handling of node terminations or scaling down activities. Karpenter manages disruptions to ensure minimal impact on running applications. It does so by handling pod evictions and rescheduling carefully to maintain availability. When a node is terminated, Karpenter might use a PodDisruptionBudget (PDB) to ensure enough replicas are available, allowing a safe shutdown. While that happens, Karpenter smartly and rapidly takes the node scaling decisions, it selects the most performance and cost optimized nodes and schedules pods on these nodes.
apiVersion: policy/v1
kind: PodDisruptionBudget
metadata:
  name: my-service-pdb
spec:
  minAvailable: 3
  selector:
	matchLabels:
  	app: my-service
How Karpenter Works
Karpenter : Simulation
Karpenter’s has a unique simulation capacity which traditional autoscalers lack. Before scaling the actual resources, Karpenter simulates the potential scaling actions based on the current workload demands and available resources. During these simulations Karpenter considers the varying workload demand, different instance sizes, and pricing options. Once the Karpenter simulation generates the potential options. These simulations allow Karpenter to choose the most optimal resource scaling decision, whether it’s about provisioning the new nodes or removing the underutilized nodes before taking action.
Karpenter’s simulations are real-time and dynamic. This allows Karpenter to re-simulate and refine scaling actions to match the new demand or situation. In addition, Karpenters has direct access to the capacity provisioning API through AWS EC2 cloud provider APIs. This bypasses the need for third-party controllers in scaling, allowing Karpenter to modify the existing infrastructure in real-time.
Now let’s walk through the step-by-step process of the node provisioning lifecycle in Karpenter. By understanding this, you’ll see how it optimizes resources and improves the efficiency of your Kubernetes setup.
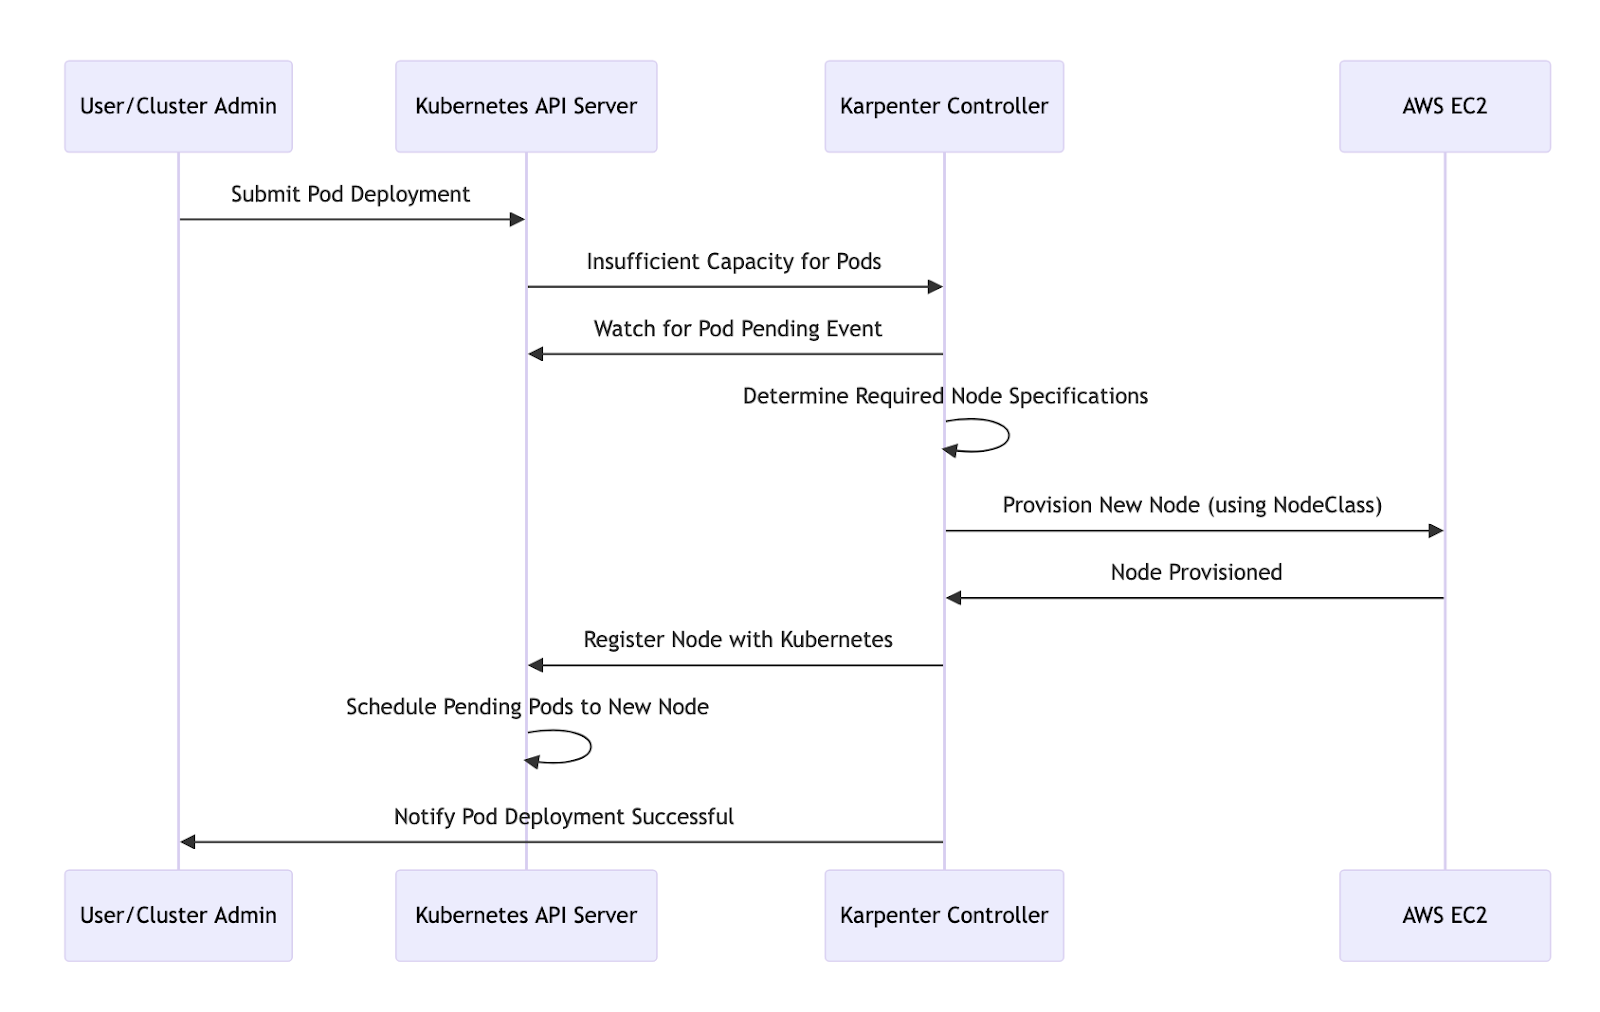
- It starts with a user requesting a new pod, triggering the Kubernetes API server to attempt scheduling.
- The Kubernetes API server tries to schedule the pod but fails due to insufficient resources.
- The unschedulable pods are marked as pending due to the lack of available resources in the cluster.
- Karpenter continuously monitors the cluster, focusing on pending pods, current node utilization, and specific resource requirements like CPU, memory, and constraints.
- Karpenter evaluates the metrics collected from the cluster and determines the number of new nodes required to meet the pending pods’ needs.
- Karpenter decides how many and what type of nodes are necessary based on the pod’s requirements.
- Karpenter sends a request to AWS to provision a new node, specifying details from the `NodeClass`.
- AWS provisions the new node, which is then added to the Kubernetes cluster.
- The Kubernetes scheduler assigns the pending pods to the newly provisioned node, enabling them to run.
But how does Karpenter determine what node size and type to choose? That’s where NodePool comes into the picture.
NodePool
Unlike traditional cluster auto-scalers that use fixed node size, Karpenter determines the size and type of the node dynamically in real-time. Different templates are specified for the nodes in a pool. These templates include various details about the range of EC2 instances that can be provisioned. Based on the pods’ requirements, Karpenter selects suitable and cost-effective instance types from the node pools and provisions the nodes. The API server can now schedule the pod on this new node post, after which the user is notified of the successful pod deployment.
Scaling
This process of provisioning additional nodes as per surge in user requests that requires scheduling the new pods is known as scaling up of the pods/cluster. Karpenter continuously monitors the utilization of resources in the cluster. Once the number of requests is back to normal levels, the Karpenter initiates the deprovisioning of the unnecessary nodes to match the reduced demand and avoid resource wastage. This process of deprovisioning is scaling down pods/clusters.
The following YAML shows the example of the NodePool with different instance types.
# This example NodePool will provision general purpose instances
---
apiVersion: karpenter.sh/v1
kind: NodePool
metadata:
  name: general-purpose
  annotations:
	kubernetes.io/description: "General purpose NodePool for generic workloads"
spec:
  template:
	spec:
  	requirements:
    	- key: kubernetes.io/arch
      	operator: In
      	values: ["amd64"]
    	- key: kubernetes.io/os
      	operator: In
      	values: ["linux"]
    	- key: karpenter.sh/capacity-type
      	operator: In
      	values: ["on-demand"]
    	- key: karpenter.k8s.aws/instance-category
      	operator: In
      	values: ["c", "m", "r"]
    	- key: karpenter.k8s.aws/instance-generation
      	operator: Gt
      	values: ["2"]
  	nodeClassRef:
    	group: karpenter.k8s.aws
    	kind: EC2NodeClass
    	name: default
In the NodePool yaml above, three different `instance-categories` are defined. Karpenter will select ‘r’ type of instance for memory-intensive tasks and ‘c’ type for the CPU-intensive tasks.
Bin-Packing Algorithm
Bin-packing is the process of placing containers, or “bins,” within nodes to maximize resource utilization while minimizing wasted resources. Karpenter’s bin packing algorithm efficiently groups the pods and schedules those based on their resource requirement on the smallest possible instance type.
The Fleet API selects the most cost-effective and reliable instance to ensure the smooth working of the workload. Further Karpenter continuously monitors the cluster’s size and adjusts the instances’ size and type to be more cost and performance effective after initial scheduling is done.
Cost Optimization Strategies
Bin Packing Algorithm
The bin packing algorithm places the workloads onto the nodes to maximize the resource usage. It utilizes each node before provisioning the newones and reduces the leftover or stranded resources, leading to a reduction in the overall cost.
JIT Provisioning (Just-In-Time Provisioning)
Karpenter uses JIT provisioning to create nodes only when they are needed, unlike the traditional auto scaler. This ensures minimum idle time for the nodes, which reduces the cost by provisioning the resources in real-time based on demand rather than keeping the nodes idle for expected demand in the future. This feature avoids paying for excess capacity.
Rapid-Scale Down Mechanism
Rapid scale down quickly scales the nodes down when they are no longer needed. It cautiously determines when to remove the nodes based on resource consumption. This reduces the number of active nodes efficiently and lowers the costs by freeing up resources that are not required.
Spot Instances
Karpenter supports using spot instances, an instance designed to utilize spare capacity in the cloud provider’s data centers for cost optimization. You can take advantage of lower prices for compute resources by using spot instances. However, please be advised that spot instances may be interrupted if the provider needs the capacity.
apiVersion: karpenter.sh/v1beta1
kind: NodePool
metadata:
  name: default
spec:
  template:
	spec:
  	requirements:
    	- key: karpenter.k8s.aws/instance-category
      	operator: In
      	values: ["c", "m", "r"]
    	- key: karpenter.k8s.aws/instance-size
      	operator: In
      	values: ["nano", "micro", "small", "medium"]
    	- key: karpenter.sh/capacity-type
      	operator: In
      	values: ["spot"]
  	nodeClassRef:
    	name: default
This CRD configures a provisioner for spot instances, optimizing costs by utilizing cheaper, interruptible resources.
Custom Instance Selection
Specifying the custom instance types and sizes for your workloads using Karpenter allows you to meet your cost and performance requirements. The following example only utilizes an ‘m5’ type instance; in the same way, we can provide instances to fit our requirements.
apiVersion: karpenter.sh/v1beta1
kind: Provisioner
metadata:
  name: custom-instance-provisioner
spec:
  limits:
	resources:
  	cpu: "2000"
  	memory: "200Gi"
  provider:
	instanceTypes:
  	- m5.large
  	- m5.xlarge
  	- m5.2xlarge
  capacityTypes:
	- onDemand
	- spot
This CRD allows you to define specific instance types and capacity types (on-demand or spot), giving you control over which instances are used based on your requirements.
Benefits of Karpenter
Improved responsiveness
Karpenter is significantly faster than the traditional auto scalers in provisioning new nodes. Traditional auto scalers can take a few minutes to respond to increased demand and launch new instances, but Karpenter responds within seconds to any unscheduled pods. This faster provisioning makes Karpenter very effective in an environment where pod requirements change rapidly.
Simplified cluster management
Karpenter takes care of node provisioning and scaling, thus reducing the complexity of cluster management. This makes it easier for us to maintain and optimize the resources.
Enhanced reliability
Karpenter intelligently selects the instance types required for the nodes, ensuring reliability and cost-effectiveness. This reduces the risk of service interruptions and ensures the cluster’s consistent performance.
Support for diverse workloads
Karpenter handles a wide range of workloads by appropriately selecting instance types based on resource requirements.
Reduced operational overhead
Karpenter automates scaling and node management, helping minimize the need for manual intervention. This lowers the operational burden and allows teams to focus on more important tasks.
Limitations of Karpenter
Stateful applications
Karpenter is primarily designed to support stateless workloads. It is challenging to manage the lifecycle of stateful applications that requires persistent storage. Karpenter doesn’t have built-in provision to ensure safe reattachment of persistent volumes correctly. This can lead to disruptions in stateful applications, hence careful handling is required during scaling operations like node eviction and termination.
Specialized hardware requirements
Karpenter’s dynamic provisioning may not always meet the need for specific hardware. If the workload requires specialized hardware, like GPU and high memory, it is better to use customized environments.
Regularized environments
Karpenter works great in dynamic and flexible environments where workloads vary. However, in highly regulated environments where consistency is important, traditional auto scalers are more appropriate. These regulated environments require nodes to be unchanging and stable, which could be harder for Karpenter to manage with its dynamic behavior and scaling.
Fine-grained node lifecycle
Node provisioning is automated in Karpenter. Whenever there is a surge in demand, Karpenter automatically scales up nodes. This limits your ability to manage the lifecycle with fine-grained control. Where as the cluster autoscaler provides more fine grained control for node lifecycle management, such as handling specific states of nodes eg. cordoning, draining etc. This fine grained control is crucial in environments that need stability, reliability and adherence to strict operational standards.
Karpenter Vs Cluster Autoscaler
Here’s a quick comparison of Karpenter vs the default Cluster Autoscaler that ships with EKS. You can also find an in-depth comparison of the two autoscalers here.
| Aspect | Karpenter | Cluster Autoscaler |
| Resource Efficiency | Automatically provisions nodes based on application needs, avoiding overprovisioning and wasted resources. | If not finely tuned, this may lead to overprovisioning, potentially resulting in wasted resources. |
| Scaling Flexibility | Karpenter uses JIT provisioning to create nodes only when they are needed, unlike the traditional auto scaler. | Scaling is based on predefined metrics and policies, which may need more flexibility. |
| Cost Optimization | Optimizes resource utilization to reduce the number of nodes required, leading to lower cloud bills. | Cost savings depend on the configuration and can be less optimized than Karpenter. |
| Node Size Specification | Allows specifying a basket of different sizes for nodes, enabling selection of the most appropriate size from a range. | Requires specifying one size per node group, which limits flexibility and may not always match the workload needs. |
| Node group management | Does not require predefined node groups; dynamically provisions and manages nodes as needed | Manages static node group, where each group is configured with a specific instance type size. |
| Scaling granularity | Provides fine-grained scaling based on the exact resource needs of workloads, allowing for precise control over node provisioning | Scaling is based on node groups, which might aggregate multiple workloads with varying needs, potentially leading to less precise scaling. |
| User-Friendliness | Easy to deploy using Helm and integrates seamlessly with Kubernetes. | Setting up can be more challenging and require more manual configuration. |
Best Practices for Running Karpenter in Production
Optimized NodePool Creation
It is normal for multiple teams to share the same cluster and have varying requirements, such as different instance types, OS, etc. Hence, creating multiple NodePools is key in this scenario. For example, one team might need Ubuntu, while others might need Windows. Similarly, teams may have specific hardware requirements, such as GPU. These teams should have their own NodePools. This ensures that each team has access to appropriate resources.
# NodePool for Ubuntu-based workloads
apiVersion: karpenter.sh/v1alpha1
kind: Provisioner
metadata:
  name: ubuntu-nodepool
spec:
  provider:
	instanceTypes:
  	- t3.medium
  	- t3.large
  os:
	name: ubuntu

---
# NodePool for Windows-based workloads
apiVersion: karpenter.sh/v1alpha1
kind: Provisioner
metadata:
  name: windows-nodepool
spec:
  provider:
	instanceTypes:
  	- m5.large
  	- m5.xlarge
  os:
	name: windows

---
# NodePool for GPU-based workloads
apiVersion: karpenter.sh/v1alpha1
kind: Provisioner
metadata:
  name: gpu-nodepool
spec:
  provider:
	instanceTypes:
  	- p3.2xlarge
  	- p3.8xlarge
  resources:
	requests:
  	nvidia.com/gpu: 1
Schedule Pods For Optimizing Costs
The following strategies may help optimize the costs when scheduling the pods with Karpenter.
- Follow EKS high availability Best Practices: Distribute the pods across nodes and availability zones. Implement a disruption budget to ensure the minimum number of pods available.
- Apply layered Constraints: Using Karpenter’s layered constraints to specify pod requirements, such as CPU requirements or particular AZ, helps pods match appropriate resources and reduce costs.
- Set resource limits and create billing alarms: Define limits on resources that Karpenter can create. Configure a billing alarm to alert you when costs exceed budget. This helps avoid unexpected expenses. The code snippet below ensures that the maximum number of CPUs does not exceed 1000 and 1000Gi of memory.
spec:
  limits:
	cpu: 1000
	memory: 1000Gi
Configure Monitoring & Alerting
Configuring Monitoring is one strategy for optimizing and maintaining visibility of node provisioning and cluster health. Setting alerts for issues such as high resource usage or failure in node provisioning can help teams proactively fix them.
# Example of Prometheus configuration
apiVersion: v1
kind: ConfigMap
metadata:
  name: prometheus-config
data:
  prometheus.yml: |
	scrape_configs:
  	- job_name: 'karpenter'
    	static_configs:
      	- targets: ['karpenter:8080']
	alerting:
  	alertmanagers:
    	- static_configs:
        	- targets: ['alertmanager:9093']
Optimizing Provisioner Settings
Provisioner configuration can be optimized further by fine-tuning the settings based on workload requirements. The resource limits and instance types can be adjusted to ensure efficient node provisioning aligned with the needs. The following code snippet shows the optimized provisioner settings.
apiVersion: karpenter.sh/v1alpha5
kind: Provisioner
metadata:
  name: default
spec:
  labels:
	intent: apps
  requirements:
	- key: karpenter.sh/capacity-type
  	operator: In
  	values: ["spot"]
	- key: karpenter.k8s.aws/instance-size
  	operator: NotIn
  	values: [nano, micro, small, medium, large]
  limits:
	resources:
  	cpu: 1000
  	memory: 1000Gi
  ttlSecondsAfterEmpty: 30
  ttlSecondsUntilExpired: 2592000
  providerRef:
	name: default
Use Karpenter Blueprints
Karpenter blueprint is a repository that lists commonly used workload scenarios and the best practices described for them. This repository provides all the resources you need to create an EKS cluster with Karpenter configured. By using blueprints, you can create standardized configurations that ensure consistency across cluster deployments.
Here’s an example blueprint for custom-ami from the repository:
apiVersion: karpenter.k8s.aws/v1beta1
kind: EC2NodeClass
metadata:
  name: custom-ami-template
spec:
  amiFamily: AL2
  amiSelectorTerms:
  - name: '*amazon-eks-node-1.29-*'
  role: "<<KARPENTER_NODE_IAM_ROLE_NAME>>"
  securityGroupSelectorTerms:
  - tags:
  	karpenter.sh/discovery: <<CLUSTER_NAME>>
  subnetSelectorTerms:
  - tags:
  	karpenter.sh/discovery: <<CLUSTER_NAME>>
Conclusion
In this post, we looked at traditional autoscaling methods, including their slow scale times, resource wastage, and inability to handle diverse workloads. We then turned our attention to Karpenter and how it addresses these challenges by offering faster scaling and better resource optimization. We looked at its architectural components and how it works to help optimize resources and bring down costs.
However, Karpenter has its own limitations, like its inability to handle stateful apps and specialized hardware requirements. However, it has the potential for optimized resource usage and cost savings, which makes it a go-to choice for many.
If you want to improve your resource optimization further, try Elastic Machine Pool. It can help you reclaim over 70% of unused capacity in your Kubernetes clusters by leveraging existing resources and going beyond existing bin packing methods. Book a demo to get a complete understanding of EMP and personalized ROI analysis.
Also read: Karpenter vs Cluster Autoscaler vs EMP – A comparison of the autoscalers