
Overview
Amazon’s Elastic Kubernetes Service (EKS) is a managed Kubernetes service offering that enables you to run Kubernetes on AWS infrastructure. EKS automates management, availability and scalability of the Kubernetes control plane, and lets you run your applications either on AWS EC2 instances or on AWS fargate. (AZs). As usage of EKS has skyrocketed, EKS cost optimization has become a key part of an organization’s over cloud cost optimization strategy.
EKS has significantly grown in usage and popularity over recent years, as consumption of cloud based Kubernetes offerings has grown recently. A study from Datadog in 2021 suggests that almost 90% of Kubernetes users leverage cloud managed Kubernetes offerings, instead of running self managed clusters, a 20% increase compared to the numbers in 2020.
As EKS adoption has grown, so has the enterprise spend on containers and Kubernetes on AWS. EKS makes it very easy to spin up new Kubernetes clusters as well as to scale existing Kubernetes clusters. This makes it easy to overspend on your EC2 instances. And if you don’t have a proper cost optimization framework in place, costs can quickly escalate consuming a major portion of your overall public cloud budget. While AWS charges a very small amount for the EKS control plane, the real cost comes from the EC2 instances that get used as worker nodes for your clusters.
This guide will educate you on the various best practices for EKS cost optimization for your AWS EKS environment.
EKS cost optimization best practices
Understand your spend
The first and most important step in building a cost optimization strategy for your EKS environment is getting a clear and deep visibility into your existing spend. A lack of visibility into your current spend that is specific to your EKS clusters often contributes to an underestimation of EKS costs. Make sure you have invested in the right tooling that gives you granular visibility into your EKS spend.
- Use AWS billing console – The AWS Billing console is designed to provide visibility into the costs of your current consumption. However, the way the AWS Billing console works, there usually is a lag between your current usage vs the billing data because AWS Billing Console data is updated only once a day. If you need to get more instantaneous visibility into your usage and cost data, for example to to debug any runaway costs, you need to use better tooling.
- Use AWS cost explorer, or other paid tools – Tools like AWS Cost Explorer are designed to give you visibility into your EKS spend.
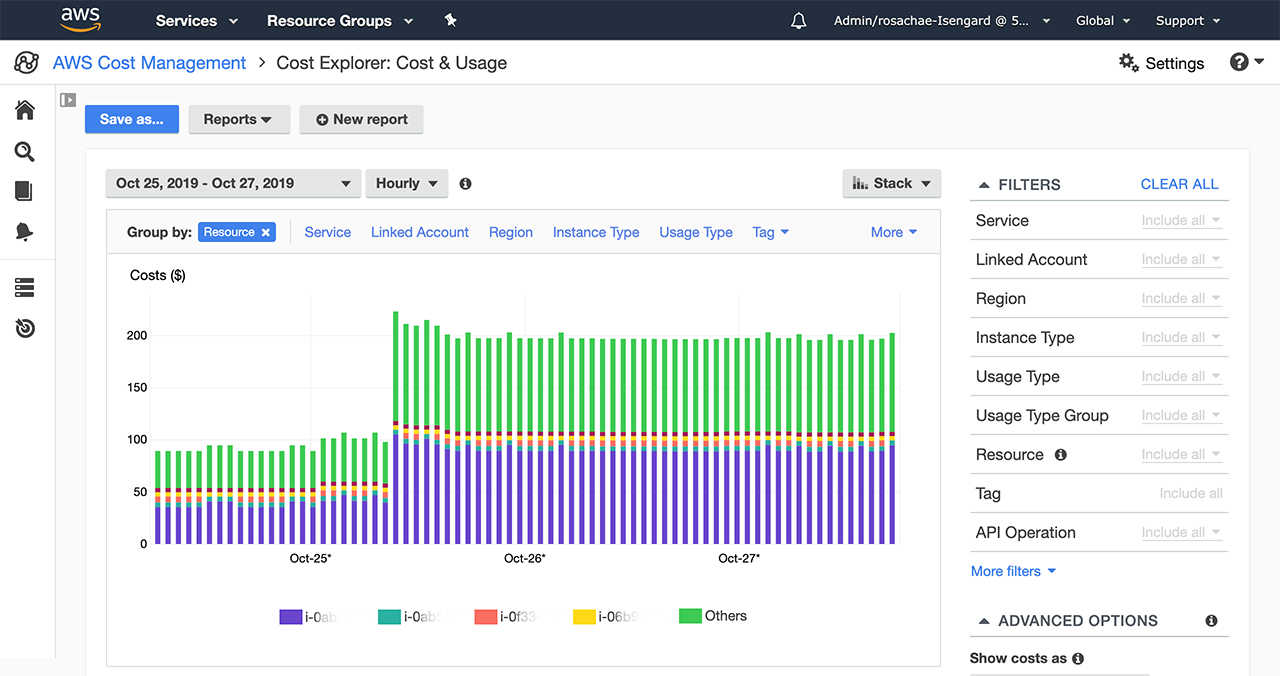
AWS Cost Explorer – Filter based on resource type and resource tags, for granular visibility
Cost Explorer will enable you to get down to the unit cost at per node and per cluster level, using their resource type and tag based filtering mechanism. For example, you can tag all worker nodes of a specific class of EKS clusters with a specific label, then use that label to identify the costs of those clusters. You can then build aggregate cost reporting at cluster, team, org level.
One limitation with the AWS Cost Explorer is that it refreshes its data at most three times in a day. So if you are looking to get more real time visibility into your usage and costs, the Cost Explorer won’t be sufficient for that. Real time visibility and alerting may be needed for your use case to avoid being hit with massive surprise bills due to massive dynamic cost spikes.
- Use third party tooling A number of third party tooling options exist that are designed to provide much more real time visibility coupled with instantaneous alerting to help you stay on top of your EKS costs. Some example tools include:
- Datadog
- Cloudability
- CloudHealth
Researching the AWS marketplace will help you find the appropriate tool for your needs.
Understand your usage
Getting an in-depth understanding of your EKS cluster resource utilization is as critical as understanding your spend, in order to make prudent optimization decisions. With full visibility into your cluster utilization, you can identify which clusters are the most underutilized in terms of their CPU and Memory resources, and then start taking steps towards optimizing them.
There are two important aspects to your cluster utilization that are both critical to monitor:
Allocated vs Unallocated Capacity
Kubernetes node resource allocation is largely defined by the resource request values you set on your pods. ‘Allocated’ capacity in the Kubernetes context is the capacity allocated across all pods currently deployed on a node based on their request values. Understanding this gives you visibility into what resources at each node level may be wasted because they are not allocated to any workloads.
To get data about your cluster allocation, first ask Kubernetes to describe a node and it will tell you how much is allocated vs how much is unallocated.
$ kubectl get nodes
$ kubectl describe node NODE_NAME
Query this for all nodes in your kubernetes cluster and you now have the total allocated vs unallocated capacity for that cluster.
Utilized Capacity
Utilization of a node is defined in terms of the amount of CPU and Memory that is currently being used on that node. Understanding your node and cluster level utilization is critical in order to truly understand and optimize your Kubernetes cost spend.
The simplest way to get the CPU and memory utilization for your cluster is by using `kubectl top` command.
Use kubectl top across all workloads on the cluster to get info about all CPU cores and memory currently being utilized, then sum them up to get the core and memory utilization.
Using open source monitoring tools such as prometheus or commercial monitoring tools is a better mechanism to continuously monitor resource utilization of your Kubernetes clusters. You can then build custom dashboards that give you visibility into this data at various levels of granularity.
Efficient node & pod auto-scaling
Node and pod auto-scaling strategies involve dynamically adjusting cluster resources based on workload demands to ensure optimal resource utilization and cost efficiency.
- Cluster Autoscaler:
- Enable EKS Cluster Autoscaler to automatically adjust the number of nodes in your cluster based on pod resource requests and pending pods in the system.
- This ensures that you have sufficient resources to handle your workloads without wasting money on idle nodes.
- Horizontal Pod Autoscaling (HPA):
- Implement HPA to automatically scale the number of replicas (pods) in your deployments based on CPU utilization or other custom metrics.
- Set appropriate thresholds to trigger pod scaling. Avoid over-provisioning resources and scale down when demand decreases to save costs during idle periods.
- Vertical Pod Autoscaler (VPA):
- VPA collects resource utilization metrics from containers running in your pods and uses that information to recommend or automatically update the resource requests and limits.
- It helps to right-size the resource allocation to match the actual resource usage of applications, which can optimize resource utilization and reduce unnecessary overhead.
- Pod Resource Requests and Limits:
- Set accurate resource requests and limits for your pods. Resource requests define the minimum resources required by a pod, while limits prevent pods from consuming excessive resources.
- Properly defining these values ensures efficient node utilization and reduces the risk of overprovisioning.
How long it takes for workload to become ready. Lets say it takes 5 minutes before app initializes after it launches but before becomes ready. Due to this amount of time, it creates availability concern – not being able to meet the demand???
Node Taints And Tolerations
In Amazon EKS clusters, Node Taints and Tolerations are mechanisms that help control which pods can be scheduled on specific nodes. Following are some of the ways you can save cost by using Node Taints and Tolerations.
- Automated Node Scheduling:
Use EKS Auto Scaling to dynamically adjust node count based on workload demands and Taints/Tolerations. This ensures sufficient capacity while minimizing idle resources.
- Graceful Node Maintenance:
Schedule node maintenance using Node Taints and Tolerations. Evacuate pods gracefully from nodes undergoing maintenance, reducing disruptions and avoiding unnecessary scaling events.
- Resource Segregation:
Use Node Taints to label nodes based on their capabilities or costs. Deploy pods with matching Tolerations to ensure resource-intensive workloads run on appropriate nodes, optimizing resource utilization and cost efficiency.
- Optimize Node Types:
Choose node types based on cost-performance trade-offs. Utilize Taints and Tolerations to match workloads with the appropriate instance types, optimizing cost and performance.
By adopting these best practices for Node Taints and Tolerations in your EKS cluster, you can optimize resource allocation, automate scaling, and ensure smooth maintenance operations.
Container Registry & Images
Following are some of the best practices for container registry & Images to save cost.
- Image Size Optimization: Minimize container image size to reduce storage costs and improve deployment speed.
- Private Container Registry: Host container images in private container registry like AWS ECR for security, faster access and reduced data transfer costs.
- Image Tagging Strategy: Use a consistent tagging strategy to manage versions and avoid using “latest” in production to prevent unintended deployments.
- Multi-stage builds: Utilize multi-stage builds in your Dockerfiles to create smaller production-ready images by using separate build and runtime environments
- Lifecycle Policies: Implement lifecycle policies to automatically remove old or unused images and keep registry clean.
- CI optimization: Optimize your CI/CD pipeline to only trigger builds and updates for necessary changes to container images.
- Monitoring and auditing: Regularly monitor and audit your container registry to identify any unused, outdated, or large images that can be removed or optimized.
By applying these container registry and image-related cost optimization practices, you can reduce storage costs, improve deployment efficiency, and enhance overall performance in your Amazon EKS cluster.
Spot Instances
AWS spot instances enable you to take advantage of unused EC2 capacity at a discounted price. Utilizing spot instances as worker nodes for your k8s cluster may result in significant cost savings, as spot instances can be 40-90% cheaper than the on demand instances.
However, if not used properly, use of spot instances may result in cluster and application outages.
Here are a few things to keep in mind to make appropriate usage of spot instances for your Kubernetes cluster.
One fundamental issue with spot instances is that they can be terminated anytime, and with relatively short notice. This makes them not an ideal candidate for a certain class of workloads. Stateful workloads that have a slow start time, don’t have good horizontal scalability and perform heavy data processing are typically not good candidates for spot instances. They will most likely not handle any interruptions gracefully. You should therefore plan to utilize spot instances for stateless workloads and for stateful workloads that are fault-tolerant.
- When AWS first started making spot capacity available, price of spot instances was significantly cheaper compared to on-demand instances, ~90% lower than on demand on average. But since then, the high demand for spot instances has brought the cost advantage down, where in some cases it may only be about 40% cheaper than on demand instances. It is therefore useful to do the cost-benefit tradeoff between spot instances and AWS reserved instances or AWS savings plan, to see if the later may provide nearly similar cost savings but without the node termination risk.
- When requesting for spot instances, use multiple instance types in your spot instance request to increase the chances of getting spot instances at the best possible prices. Using multiple instances with EKS managed node groups. It’s generally a good idea to maintain flexibility across a minimum of 10 instance types for every workload. Furthermore, ensure that all Availability Zones are properly set up and selected for your workload within your Virtual Private Cloud (VPC). As the capacity for each instance type in an Availability Zone varies independently, embracing instance type flexibility can frequently lead to increased computational capacity at a lower cost.
- Set a bid price that is close to the on-demand price but not too high. A reasonable bid price increases the likelihood of getting spot instances while still enjoying significant cost savings.

- Use the AWS Spot instance termination handler to gracefully drain pods before spot instances are terminated. This ensures that important workloads are not disrupted and can be rescheduled on other nodes of the cluster.
Pod Disruption Budgets
Pod Disruption Budgets (PDBs) are a Kubernetes feature that helps ensure the availability of applications running in a cluster during disruptive events such as node maintenance, updates, or scaling events. PDBs are also relevant in the context of cost optimization because they can help you control costs associated with managing your EKS cluster.
Here’s how Pod Disruption Budgets can be used for cost optimization:
- Graceful pod evictions during node scale-downs:
When you scale down your EKS nodes, pods running on those nodes need to be evicted to make room for the reduced capacity. By defining a PDB, you can specify the minimum number of replicas (pods) that should be running for each application. This ensures that Kubernetes will not evict more pods than the PDB allows, preventing unnecessary pod evictions that might trigger additional node scaling events and incur additional costs.
- Preventing costly disruptions during spot instance terminations:
If you are using spot instances to save costs, there’s a risk that these instances might get terminated by AWS when the spot price rises or when AWS needs the capacity. By configuring a PDB, you can define the minimum number of replicas that should be available at any time. This helps prevent too many pods from running on spot instances, reducing the risk of sudden disruptions and associated downtime costs.
- Cost-efficient node draining:
During node maintenance or updates, Kubernetes will drain the nodes to move the pods to other nodes gracefully. By setting a PDB, you can control the disruption budget during node draining. For example, you can specify that a certain number of replicas for each application should always be running on nodes that are not affected by maintenance. This way, Kubernetes will prioritize draining other nodes first, ensuring minimal disruption and potential cost savings due to more efficient resource usage.
- Limiting pod replicas for cost control:
In some cases, you might have certain applications or microservices that are less critical and can tolerate temporary unavailability. By defining a PDB for these applications, you can set a lower minimum number of replicas, allowing Kubernetes to scale down those pods and save costs when resources are needed for more critical workloads.
Pod Disruption Budgets are a powerful tool that helps you control the availability and resource usage of your Kubernetes applications in Amazon EKS. By leveraging PDBs effectively, you can optimize costs by minimizing disruptions, preventing unnecessary scaling events, and ensuring resources are used efficiently based on the priority of your applications.
AWS Instance Scheduler
Use AWS Instance Scheduler to automatically turn off and on your EC2 and RDS instances. This helps save money by shutting down instances when you don’t need them and starting them up when you do.
How to Use It:
To make the most of AWS Instance Scheduler, you need to do these steps:
- Decide which instances you want to schedule.
- Figure out when they should start and stop.
- Create a schedule for each instance.
- Connect the schedule to the instance.
Tips for Success:
- Schedule instances to run during the times when you need them the most and stop them when you don’t.
- Create different schedules for different types of instances. For example, development ones can stop at night, while production ones should keep running.
- Use tags to group your instances so you can set schedules more easily.
- Keep an eye on your costs to make sure you’re not paying for instances you’re not using.
AWS Graviton instances
AWS Graviton instances, powered by AWS-designed custom technology, offer up to 40% better price performance compared to traditional x86-based instances. They’re a smart choice for cost-conscious EKS users.
Graviton instances shine in compute-intensive tasks, like web servers, databases, and containerized applications. They’re also ideal for flexible workloads that can handle interruptions, such as Spot instances.
Key Benefits:
- Cost-Effective: Graviton instances save money by delivering strong performance at a lower cost.
- Cloud-Optimized: They’re designed specifically for cloud computing, making them a tailored fit for AWS services like EKS.
- Flexibility: Graviton instances suit a wide range of workloads, adding versatility to your EKS cluster.
- Interruptible: If your workloads can handle occasional interruptions, Graviton instances can provide cost savings.
GP3 volumes
GP3 volumes are better for EKS cost optimization because they offer a number of benefits over other EBS volume types.
- Cost-Effective Choice: GP3 volumes are a cost-effective option for EKS because they are 20% cheaper than GP2 volumes, saving you money on storage costs for your cluster.
- Improved Performance: GP3 volumes offer up to 30% higher throughput and up to 10% higher IOPS than GP2 volumes. This means your EKS workloads can perform better without costing you extra.
- Automatic Scaling: GP3 volumes automatically adjust their performance based on your workload’s needs. This means you won’t pay for more performance than you actually use, avoiding overprovisioning and overspending.
- Encryption Included: GP3 volumes come with built-in encryption for data at rest, enhancing security without added cost.
AWS Commitment Based Discounts
AWS commitment based discounts are discounts on on demand pricing offered by AWS for your ec2 instances and other services, in return for a larger purchase commitment. By default, and without any pre-purchase commitment, you can consume ec2 instances on demand, or as spot instances, with the tradeoff that the spot instances may get terminated anytime with relatively short notice.
If you are able to estimate how much AWS compute capacity you would need for a year (or 3 years), then you can benefit from better pricing discounts offered by AWS in return for that commitment.
Following table describes various options available across Reserved Instances and Savings Plan and their tradeoffs wrt on demand instances. It also provides example discount values for each.
NOTE – the discount values stated here are based on the discount values provided on the AWS website pricing data and only provided to give you an idea of what level of discounts you could get with different options. The actual discounts will vary depending on your instance type, region etc. Please refer to the AWS website for the final discount details.
| Attributes | Standard Reserved Instances | Convertible RIs | EC2 Instance Savings Plan | Compute Savings Plan |
| Details | Can provide guaranteed capacityMust select Instance families, Region, tenancy, OS upfront.Flexibility to change the AZ, Instance size & networking type | Flexibility to use different Instance families, OS, tenancies, AZ, Instance size & networking type | Must select Instance families and Region upfront but can use any instance type within the familyNot available in all regions eg China | Most Flexible. Applies to EC2 instance usage regardless of Instance family, Region, Instance size, AZ, OS or tenancy.Also apply to Fargate or Lambda usageNot available in all regions eg China |
| No Commitment. Pay as you go, cancel anytime | Not Available. | Not Available. | Not Available. | Not Available. |
| 1 year commitment, no upfront payment | 37% | 27% | 38% | 27% |
| 1 year commitment, upfront payment | 41% | 31% | 41% | 31% |
| 3 year commitment, no upfront payment | 57% | 49% | 57% | 49% |
| 3 year commitment, upfront payment | 63% | 54% | 63% | 54% |
In addition to the above, the following two options are also available.
- Spot Instances – Spot instances are similar to on-demand instances in that no upfront commitment is required. But with spot instances, you do make availability tradeoffs. More details in the ‘Spot Instances’ section of this document.
- Enterprise Discount Program (EDP) – AWS offers EDP as an option on top of purchasing Reserved instances or Savings plan. EDP usually requires much higher annual commitment from the customer, and it’s a use it or lose it model. You pay upfront for a certain commitment for a year’s worth of usage and you get a discount that usually applies to any AWS services that you consume.
Tuning Recommendations
EKS tuning recommendations involve fine-tuning various aspects of your EKS cluster and applications to achieve better resource utilization and cost efficiency.
- Use cost allocation tags to track and analyze EKS spending by different teams, projects, or environments. This provides visibility into the cost drivers, allowing you to optimize costs where needed.
- Regularly monitor your EKS cluster and applications using tools like Amazon CloudWatch and Kubernetes monitoring solutions. Continuously review resource usage patterns and adjust configurations as needed to achieve cost optimization.
- Regularly assess the performance and resource requirements of your applications to choose the right EC2 instance types. Right-sizing the nodes helps avoid underutilization and overpayment for resources.
- Identify workloads suitable for Spot Instances and adjust the Spot Instance bid price based on your cost requirements. Continuously monitor the Spot market to make informed decisions on Spot Instance usage.
- Adjust the configuration of the EKS Cluster Autoscaler to fine-tune node scaling based on your workload patterns and resource demands. Experiment with different settings to achieve the optimal balance between availability and cost.
- Regularly review and adjust resource requests and limits for your application pods. Accurate resource definitions help Kubernetes allocate resources efficiently and prevent overprovisioning, leading to potential cost savings.
By implementing these tuning recommendations, you can continually optimize the performance and cost-effectiveness of your EKS cluster, ensuring that you are efficiently using resources and achieving cost savings where possible
Using AWS native tools such as AWS Cost Explorer and AWS Compute Optimizer can be helpful to get hints about what instances should be optimized.
At the end of the month, AWS sends you a final invoice listing the details of your usage. The problem with the AWS invoices is that they show aggregate charges only, with no information on what specific resources created the charge. However, AWS also gives you access to the raw data used to create your invoice. This is where Cost Explorer comes in play. You can upload the AWS Cost and Usage Report into an S3 bucket, then provide access to it in your Cost Explorer. Cost Explorer will then provide a more granular visualization of your data, where you can drill down to specific instances that were specifically expensive. You can also view instance tags here to better understand what that node may be used for.
Limitations of AWS Native Tools
There are some limitations with using AWS native toolset however:
- No node to workload association – AWS Cost Explorer or Compute Optimizer may show you an increase in EC2 cost tagged for your EKS workers, but you can’t see which K8s workloads may be scaling or contributing the most to the increase, out of all workloads that may have been provisioned on that node.
- AWS Cost Explorer data is not real time – Cost Explorer updates its data three times in a day, at the most. Unless your Kubernetes environment is not very active, for debugging most scenarios, you will need more real time data than this.
Paid tools from other vendors such as datadog may be of benefit here as some vendor tools have the ability to go a step further and correlate the node cost with the application running on it.
Right size resources
Right sizing of your Kubernetes resources involves performing a thorough analysis of your application’s resource usage, across CPU, Memory, Storage, Networking, and then adjusting the application’s CPU and memory request and limit values, so that the application only uses the resources it needs. This avoids over-provisioning to save costs.
One of the most common reasons for application cost overrun is that the request and limit values set for the application are too conservative. Typically these values are set based on the peak requirements of an application, however in 90% of cases the application may not need these resources. Setting the application QoS to be Guaranteed (done with request is equal to limit) in such scenarios will result in resource wastage.
Step 1: Estimate your application’s resource requirements to right size application pods
- If you’re looking for guidance on sizing pods for an existing application, skip ahead to the next section. But if you’re working on a new application that is going to be deployed to production for the first time, it can be difficult to know how much CPU and memory it will need in a real production scenario.
- In these cases, the first step would be to make an estimate based on the application code and benchmark it on sample inputs. The best people to make this effort are the developers working on the service. Initially, they can benchmark components of the application separately, and then perform end-to-end benchmarks as development progresses. Establishing a ballpark expectation upfront may be useful to ensure business objectives are met—for instance, if performance is poor, the service may end up being too costly to run. However, this estimate should be checked with benchmarking as the project progresses, in order to avoid discovering major overruns when going into production and opening up your application to customers.
- Use these estimates to set the appropriate request and limit values for your k8s service.
- This first estimate needs to be conservative; we recommend that you request more than you think the service will need. If you request less CPU than needed, performance issues may arise due to throttling. If you request less memory than the application regularly needs, then Kubernetes will evict the pods often. In the worst case, the kernel may kill container processes if they are using too much memory (OOMKilled).
- Once you’ve made a first estimate, you can monitor your containers’ resource usage and make adjustments from there.
Step 2: Further optimize the right sizing process
Making a best-effort guess about the resource requirements of your application is a step in the right direction, but over the long run, you’ll want to use tools like the Kubernetes Vertical Pod Autoscaler and historical data to rightsize your workloads.
The Kubernetes Vertical Pod Autoscaler
- As a way to make it easier to rightsize pods, the Kubernetes project launched a project called the Vertical Pod Autoscaler (VPA). The VPA collects CPU and memory usage telemetry over time and uses that data to recommend appropriate values for your containers’ CPU and memory requests and limits. The VPA can also be configured so that those recommendations are applied, meaning that your pods will automatically be rescheduled with the new set of requests and limits.
- This looks like a good starting point. But in order to decide if the VPA is the right solution for your workloads, it is important to understand how it works, how it makes its recommendations, and some of its current limitations.
- The VPA currently uses the Kubernetes Metrics Server, a daemon that collects resource metrics from kubelets and exposes them in the Kubernetes API server. This means that in order to use the VPA, you would need to deploy and operate the metrics-server Deployment in your Kubernetes clusters.
- Another factor to take into account is that, by default, the VPA makes recommendations of your containers’ future resource usage based on historical data observed over a rolling window. This may work well for workloads with stable usage of CPU or memory, but it wouldn’t work as well for workloads with different usage patterns, like those with periodic spikes and dips in CPU usage. To mitigate this, VPA 0.10 shipped with support for alternative recommenders, but this still introduces the overhead of having to implement custom recommenders for different workloads’ resource usage patterns.
- As long as you’re aware of these limitations, the VPA can be a good way to start getting recommendations based on production data.
Step 3 Right size your replica count
When you are able to horizontally scale pods, you have a choice of doing say 10 replicas that are small, or 3 larger replicas, or 1 large replica. Making the right decision here has direct correlation to avoiding wasted resources.
Challenges with rightsizing
One challenge with using VPA is that it can not resize workloads in place. VPA needs to restart your workload in order to make its changes effective, which may result in an outage. So this introduces an availability concern that you must address.
Optimizing EKS Costs using Real-Time Auto-sizing
Many of the strategies around EKS cost optimization mentioned above have one or more of the following limitations:
- Level of automation – Strategies that involve reading reports from observability tools to identify over-provisioned resources require a lot of manual back and forth work
- Pod disruption impact – Many pod right sizing tools or manual ways to perform pod rightsizing require taking pods down that creates pod and application downtime. Your application may or may not be able to tolerate this. Using spot instances for EKS cost savings also has this downside.
- Need to convince developers to change request values – Making changes to requests of your app requires approval from your developers first. Many developers are resistant to a tool or a person making changes to request values that they have tuned and tweaked after months of experimenting with application performance.
Another approach to EKS cost optimization is by using a tool that will work completely behind the scenes and optimize your EKS costs by real-time auto-sizing and allocating resources to your Kubernetes worker nodes only based on the current resource demand. This is the approach that Elastic Machine Pool (EMP) takes. EMP makes use of proven virtualization best practices to allocate resources to your EKS workers on demand based on their needs. EMP can also ‘live migrate’ your EKS workers behind the scenes so that allocating required resources to your applications will never cause pod disruption or downtime. Using this approach, EMP is able to provide to you savings that are similar to using spot instances, but without the risk of instance downtime.
You can read more about EMP’s unique approach here
Summary
It can be easy to overlook your AWS EKS spend when you are in the early adoption phase. However, as your EKS adoption grows rapidly, costs can quickly skyrocket. We therefore recommend employing proper cost optimization framework early on, once you make an organization wide decision to standardize on AWS EKS as your Kubernetes platform of choice.
Following these recommendations and creating a well defined plan around EKS cost optimization will result in significant savings and predictability for your EKS environment.